
While Windows 11’s stable version will drop somewhere around late fall, it comes with a set of pre-requisites that need to be fulfilled for a free upgrade from Windows 10 to Windows 11.
A key requirement for Windows 11 is to have a TPM 2.0 chip installed and Secure Boot enabled. Several existing Windows users were left wondering about questions like what is TPM 2.0? Do I have a TPM 2.0 chip? Do I need a TPM module for Windows 11? How to install TPM 2.0 on Windows? Well, we answer all your questions.
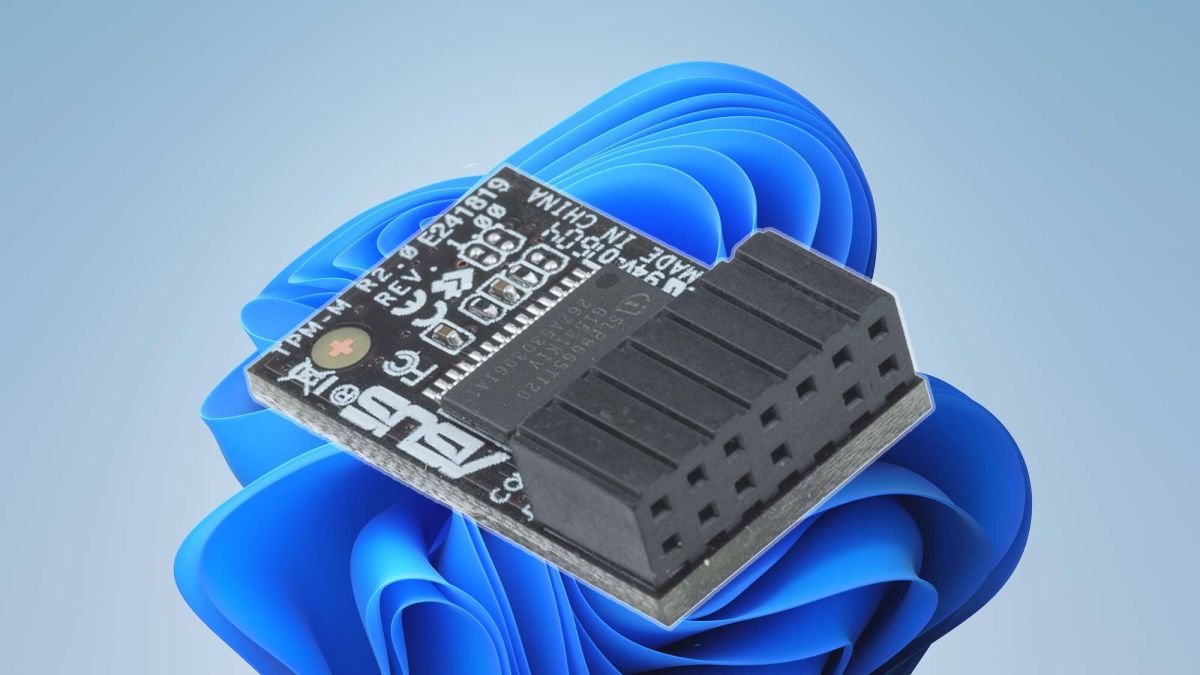
Can I add TPM 2.0 to my computer? One option, if your CPU doesn’t natively support TPM 2.0, is that you can add a separate physical module to your machine to upgrade its support. You need to check your motherboard manual to make sure there is an SPI TPM 2.0 header present, and then it’s a case of tracking down a compatible module.
Can Windows 11 install without TPM? To install Windows 11 without TPM, head to the Windows 11 download page and click ‘Download Now’ under the ‘Windows 11 Installation Assistant’ section. This will download the Windows 11 installer. When you run it, you’ll get a message that “This PC can’t run Windows 11.”
How do I bypass Secure Boot and TPM 2.0 in Windows 11? One such issue is the requirement of ‘Secure Boot’ along with ‘TPM 2.0’ enabled computers. However, if you are using a UEFI BIOS Mode machine, you can pretty straightforwardly bypass TPM on Windows 11. You simply have to go to BIOS settings and enable the ‘Secure Boot’ and ‘TPM 2.0’ options.
What Is TPM 2.0?
TPM stands for Trusted Platform Module. It is a hardware module that is used for secured boot and checking system integrity. Windows operating system also uses it for file and disk encryption along with BitLocker.
TPM 2.0 was released in 2019. It is the latest version and an upgrade over TPM 1.2 which was released way back in 2011. Most latest premium and enterprise-level laptops/PCs released after 2016 have TPM 2.0 installed. In case you are unsure about the TPM version, here’s a simple way to check in Windows 10 and Windows 7.
Check/Change TPM Status and Version
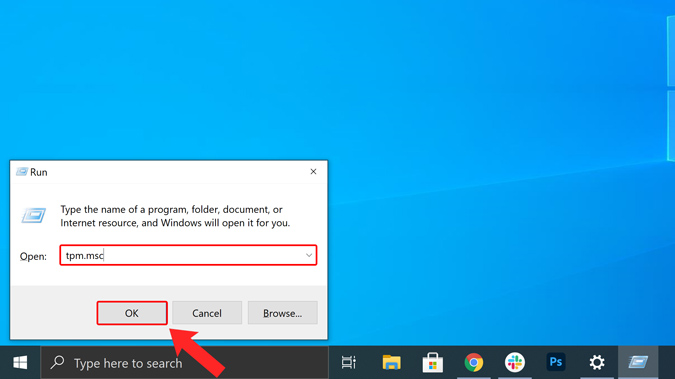
In order to check if you have a TPM module, press Win+R to trigger the Run prompt and type tpm.msc. Next, hit Enter.

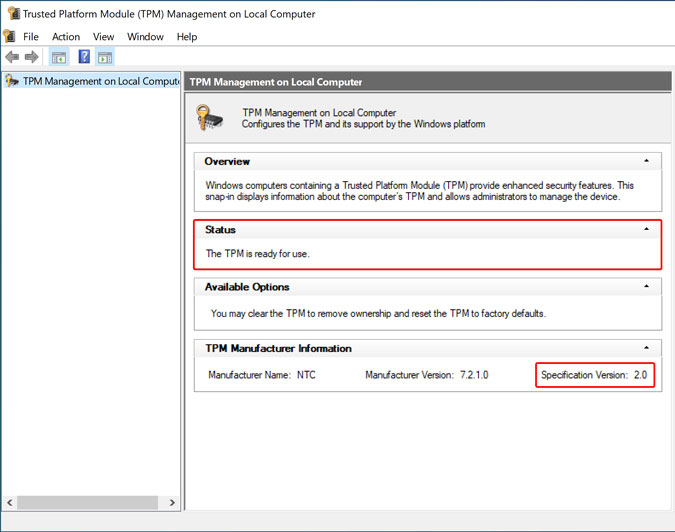
On the TPM management page, you will see your TPM status. In my case, the status is “The TPM is ready for use”. You can even see the TPM version at the bottom under TPM Manufacturer Information.

If your TPM module status is turned off, you have to enable it in your UEFI firmware settings menu. The menu options are different for every laptop depending on the manufacturer. Generally, you can find the TPM option under Security or Advanced Settings. The TPM module is called PTT for Intel processors and FTPM for AMD processors.
Does My Motherboard Have TPM Header?
Now if your PC doesn’t have a TPM chip, don’t worry. Most motherboards have a TPM header and you can install a TPM module manually. If you are unsure about it, you can check on your motherboard manufacturer’s site. You just have to Google your motherboard model number and check the technical specs on the ‘manufacturer’s site.
For instance, let’s just pick up the ROG Strix-B450F motherboard. On the Asus site, if you check under technical specs, you’ll see the TPM header under I/O ports. This means that the Asus B450F motherboard has an option to install the TPM module.

If you can’t find the information on the manufacturer’s site, you can also physically inspect your motherboard. It usually is around the RGB header or COM ports. For reference, in the ROG Strix B450F, the TPM header is beside the COM port.
How to Install TPM 2.0 Module
If your PC has a TPM header, you can easily get a TPM 2.0 module for your motherboard. This will make your PC Windows 11 compatible if you fulfill other requirements.
However, finding the right TPM 2.0 module is the hard part. You need to get the exact pin number and pin layout of your motherboard’s TPM header. For instance, let’s take the above-mentioned B450F motherboard again. The manual says it has a 14-1 PIN header with the following PIN layout. Hence, I have to buy a 14-1 PIN TPM 2.0 module.
You have to ensure that the TPM module you buy has the same PIN layout as your TPM header. More importantly, it has the same PIN lockout.
How to check Windows 11 TPM 2.0 compatibility on your PC
The Windows 11 update is going to be available for free to anyone who wants to install it. But not all devices that can run Windows 10 are eligible. That’s something Microsoft hasn’t quite managed to explain so far, but it all boils down to one simple fact: Windows 11 requires TPM 2.0 compatibility.
Intel and AMD added TPM technology to many of the CPUs released after 2013, and they support TPM 2.0. But they have specific names for each platform. Intell calls it Intel Platform Trust Technology (Intel PTT). AMD has its own name for it: AMD Platform Security Processor (AMD PSP FTPM).
Now that you know what to blame for that Windows 11 upgrade error, it’s easy to fix the problem. Just head over to the BIOS section of your PC, and search for TPM under the names above. The setting is usually found in the advanced settings or security settings. Whether it’s Intel PTT or AMD PSP FTPM, turning them on should fix your Windows 11 upgrade problems.
After you enable TPM 2.0 settings in BIOS, save the changes, reboot, and try the PC Health Check tool again. If the Windows 11 upgrade error persists, you might have a different problem. Otherwise, you’ll be installing Windows 11 in no time.
How do I know if TPM 2.0 is enabled Windows 11? How to Check if TPM 2.0 Is Enabled or Not:
- Open Start and search for Run utility or press the shortcut key – Windows+R.
- Type tpm. msc in the text box and press Enter.
- Check the TPM status and specification version.
How to enable TPM via Windows 10
To enable the trusted platform module (TPM) on your computer through the Windows 10 settings, use these steps:
Warning: Changing the incorrect firmware settings can prevent your device from starting correctly. You should access the motherboard settings only when you have a good reason. It’s assumed that you know what you’re doing.
- Open Settings.
- Click on Update & Security.
- Click on Recovery.
- Under the “Advanced startup” section, click the Restart now button.
- Click on Troubleshoot.
- Click on Advanced options.
- Click the UEFI Firmware settings option.
- Click the Restart button.
- Open the security settings page.
- Open the security settings page.
- Select the Enabled option and press Enter.
- Exit the UEFI settings.
- Confirm the changes to restart the computer.
Leave a Reply